|
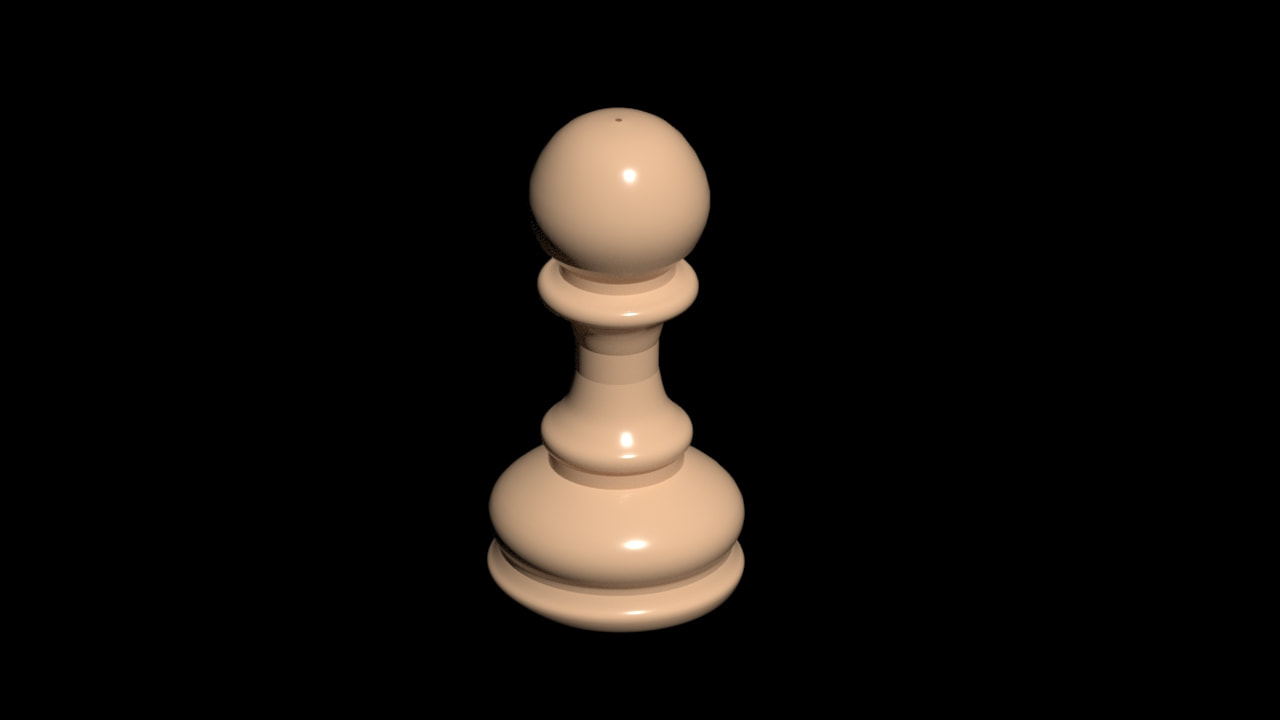
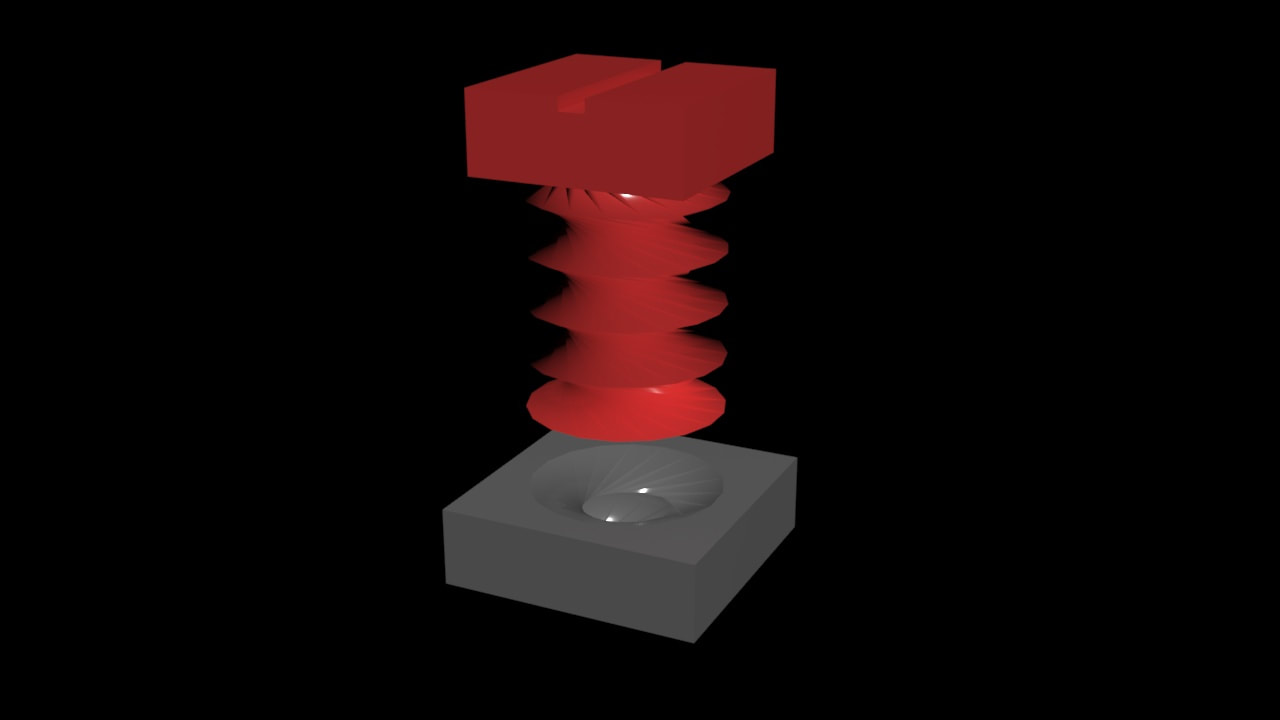
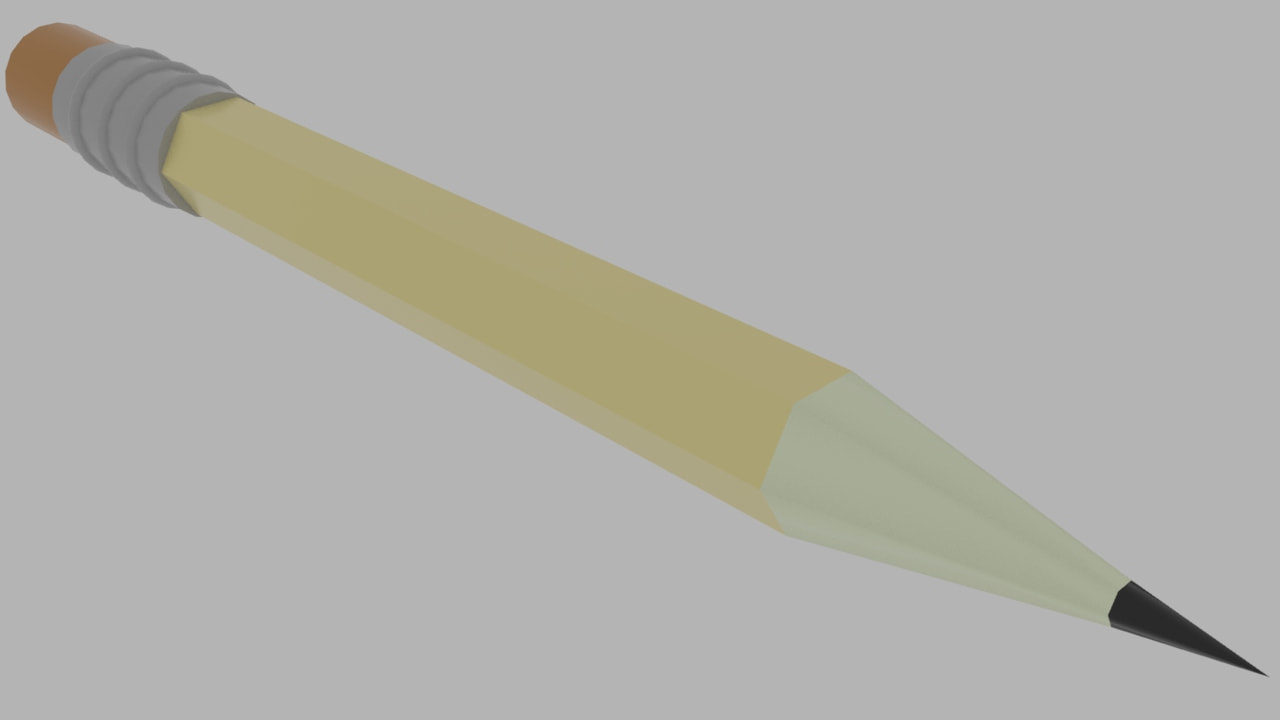
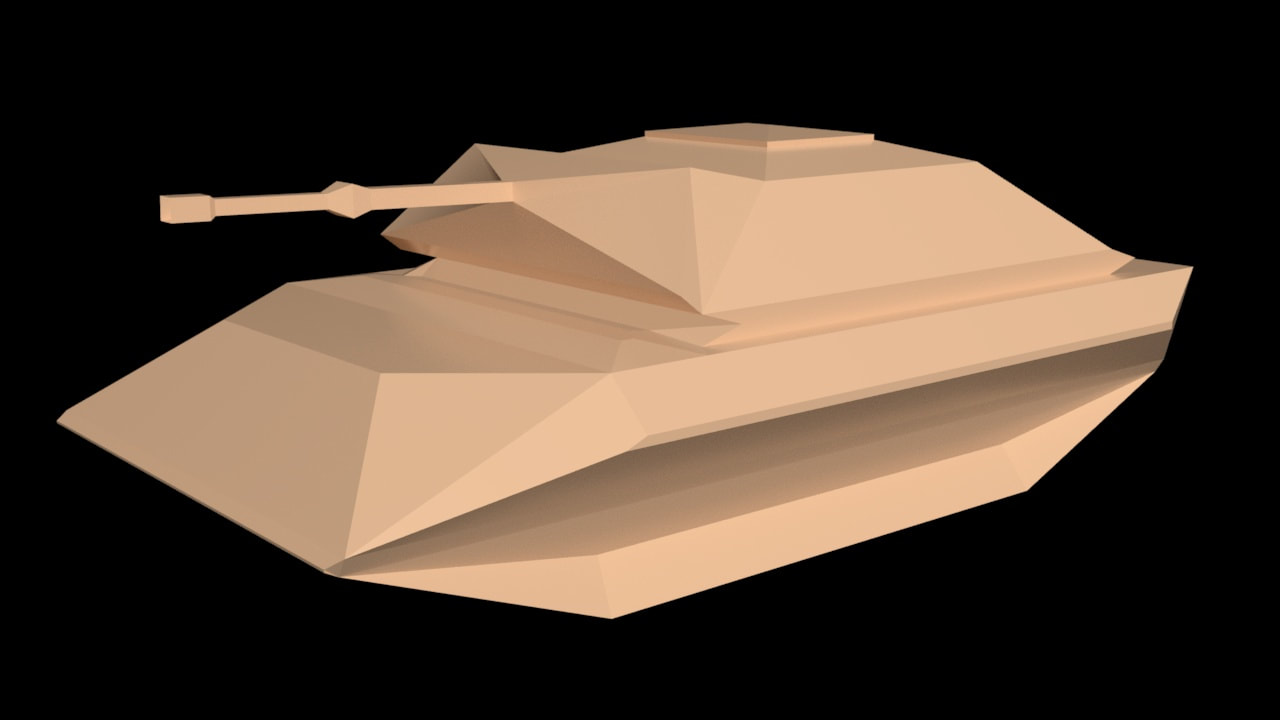
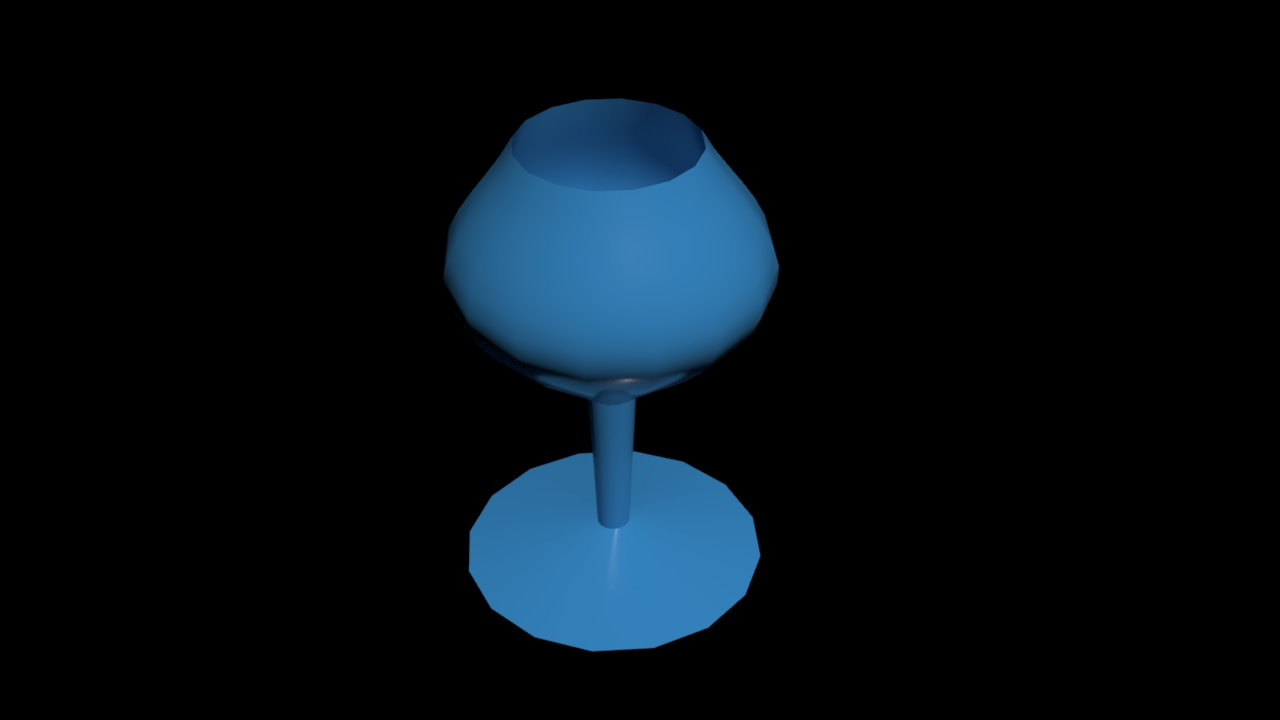
I have learned a lot from the first quarter of the computer modeling and design class that I'm in. What I primarily learned in this quarter is how to 3D model and animate in 3DS max. What I first learned about in 3DS max is the use of standard primitives. In my first project, I was assigned to animate a rolling ball in between 4 buildings, using the box and sphere standard primitives, changing the dimensions and colors of the standard primitives, and then animating the ball. After this, I was assigned to 3D model a snowman and a pencil while also using standard primitives, although this time, the objects we were modeling were made up of multiple standard primitives. The collection of standard primitives needed to be used being a wider selection of boxes, cylinders, cones, and spheres. I also was assigned to use the duplicate tool and change the dimensions of these primitives in more complex ways. Like changing the amount of sides that a 3D object has. After this, I was tasked with a project involving the use of something that I hadn't used before at the time; Modifiers. Using modifiers, I was tasked with the creation of three scenes. A chess pawn, a wine glass, and a nut and bolt. Starting with the nut and bolt, I placed a selection of standard primitives down that would later be modified into my nut and bolt. These standard primitives are cylinders and cuboids. The modifiers that I used were the pro boolean and twist modifiers. After my nut and bolt, I started to work on my pawn and wine glass which were made using the same tools. For both, I started tracing my shapes out with the use of the spline 2D objects, (primarily bezier splines), Then using a modifier to turn my flat objects into 3D ones in a way where the 2D object wraps around itself infinitely around a certain line. After this, I was introduced to the use of editable poly conversions. which is taking a standard primitive and changing its properties in ways that modifiers couldn't do modifiers. What I had to do for each assignment that I was tasked to do was convert a cuboid into a tank and then a spaceship by converting them into editable polys, then changing their properties by editing the location of the vertices, sides, corners, then changing their shapes in many ways such as extruding, beveling, and much more. After being finished with these assignments, I started work on one that introduced the use of landscaping and more modifiers. What I had to do here was create multiple rock, flower, and mushroom models then clone them and place them down into a landscape. With the flower models, I was introduced to the group tool, which groups multiple objects into one, so that you can change the location, color, and dimensions of a group of objects without having to do it to them individually.
0 Comments
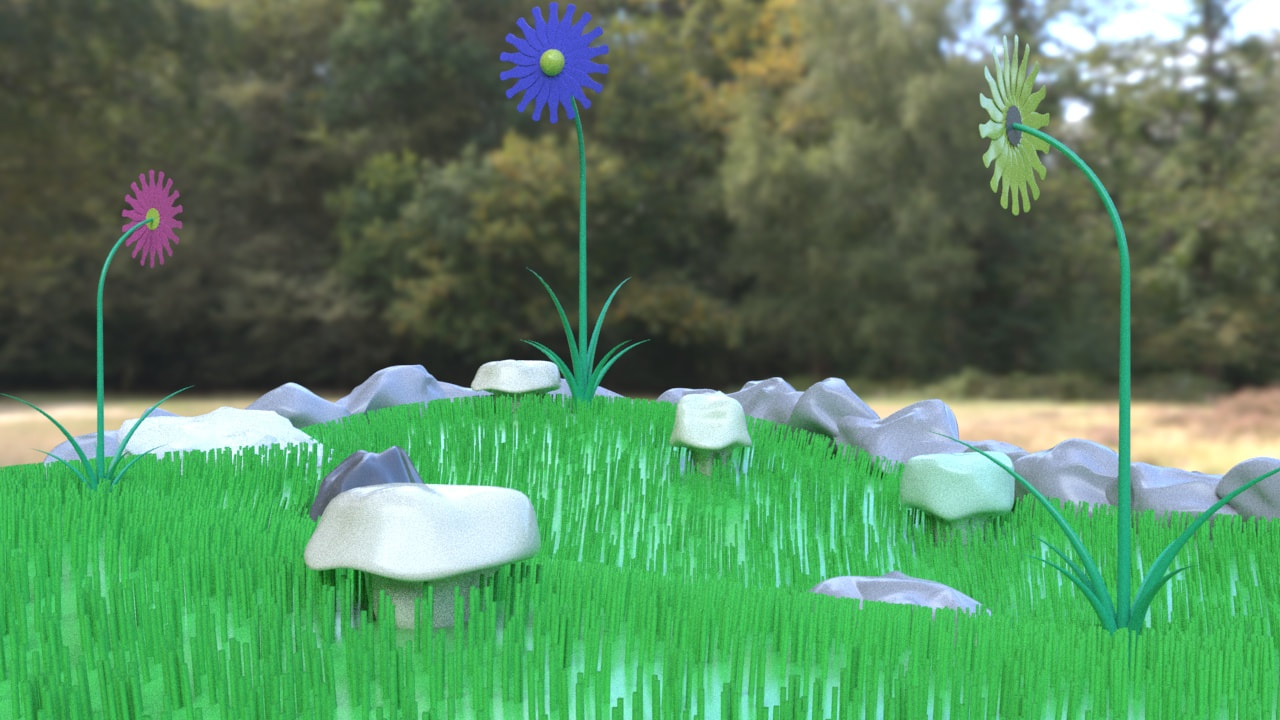
I began this project by working on the mushrooms. what I did was follow the tutorial, and then started changing the shapes of the mushrooms. What I first did in this process was I duplicated my mushroom to make four copies of it, then changed things like their color, width, height, thinness, thickness, noise seed, level of noise, and then their level of smoothness. After I created my 5 mushrooms, I started working on my rocks. What I did was place an ellipsoid down, and then I did the same thing that I did to my starting mushroom to my ellipsoid. I created 4 clones, then changed their colors, their width, their height, etc. After this, I started working on my flowers. After following the tutorial, I created 4 clones, then changed the colors of the pedals and then the sizes of my 5 flowers. After having been done with My mushrooms, rocks, and flowers, I started working on where I would be placing all of them. First off, I grouped all of the parts of my flowers, then imported all of my rocks, flowers, and mushrooms into a new plain. After this, I added A cuboid, Made it green, gave it a noise modifier, then smoothed it to add hills. After this, I thought of many ways to add grass to my Hills. What I decided to do was add the hair modifier to it, changing the size of the "hairs", then making them green of course. Lastly, I wondered if something was missing on the edges of these hills. so what is did was I made many clones of one of my rocks, then made the clones surround the hills, then to avoid the surrounding rocks looking lazily placed, I merged all of them, then added a second distortion modifier and smoothing modifier to all of them to give all of them a different look. After this, all I did was duplicate some of my mushrooms and then place everything in their own designated spot to make the landscape look natural. However when I rendered my final product, I noticed its blandness from the background, so what I did was I added an image background found in the 3ds max files that resembled a forest, then I rendered my 3 images. The things that I liked about this project were learning how to use a lot more modifiers and rendering my final product, as I am very satisfied with my final renders. Some of the easiest parts of this project were changing the shapes and sizes of my rocks, flowers, and mushrooms, and creating the hills. Some of the hard parts of this project were trying to figure out how to use the hair modifier for my grass, and adding rocks to the perimeter of my hills, as the computer I was using was very angry at me while I was doing so. The skills that I have gained from this project were improving my ability to pick the right modifier(s) for any given object that I'm editing, and Landscaping in 3ds max. Something that I have learned from this project was learning how to use a lot more modifiers, like the hair modifier, noise modifier, smooth modifier, and a lot more. Another thing that I have learned from this project is how to add an image background to my plan. Which is very useful. I extended my knowledge of 3D modeling from this project by learning how to import things from plains into other plains, and how to turn simple 3D primitives into somewhat complex shapes using a relatively small amount of modifiers. I do think that this lesson was very good, however, I think that this lesson could be improved if it integrated more of what we've learned previously in 3ds max. Which is converting objects into editable polys, and then editing them as editable polys without using modifiers.
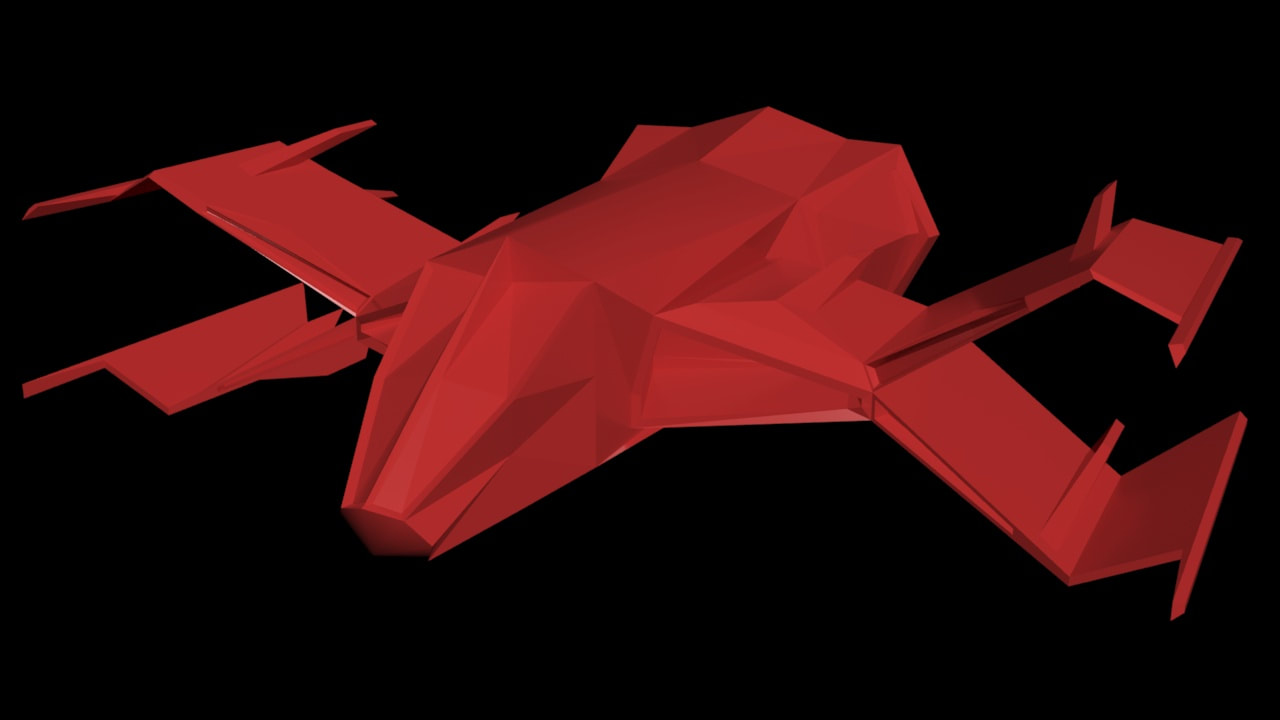
I started this project by changing the shape of the wings. I did this by extruding a polygon at an angle on one of the wings and then changing its dimensions so that it would match the wing below. the tool I used to do this was the chamfer tool, which I used to add and then shrink 2 new polygons that I would then extrude and then bevel as a way to add flaps to the top wings of the spaceship. I still felt like there were a few things that were missing on the wings, what I decided to add to them was a rear booster to add more detail to the back view of the spaceship. I did this by using the chamfer tool to add and then shrink a polygon of the same geometry, then using the extrude tool and bevel tool to subtract the part of the wings that the polygon was covering. After this, I decided to do one more thing to the wings. What I did here was I wanted to add blasters to 4 of the outer wings. what I did was I selected the spaceship's wings' outermost polygon, then beveled it twice to give it the shape of a hexagon, after this, I just lengthened the hexagon by using the extrude tool with a lock on it. After this, I noticed that the top was lacking a bit so I heightened the altitude of the centermost line of the spaceship to give the center of the spaceship a more detailed look, after this, I decided to add more to the back of the spaceship, more boosters! What did for this was I selected the sides of the already existing boosters on the back of the ship, turning the lock tool on to avoid distortion in any bordering polygons, then extruded to lay the foundation for my new two boosters. what I did for this was I used the same process that I did with the rear boosters on the wings. Chamfer tool to shrink the polygon, then extrude and bevel to hollow out the chamfered polygon. Some of the things that I liked about this project were using the symmetry tool for the first time, and modeling something that I found very fun to model, A spaceship! Some of the easiest parts of this project were rending the images and eventually putting them into the Weebly blog editor (as I am very used to doing so now) and using the extrude, chamfer, and bevel. which are three tools that I have mastered using at this point. (excluding any implications other than polygons on an editable poly). One of how I can use this lesson in the real world would probably be for aircraft design, the reason why I say this is because while spaceships are certainly not airplanes/jets, some of the design features I added to my spaceship are design found on jets/airplanes. Such as flaps, which are found on the wings of my spaceship. The skills and knowledge I learned to produce this product were how to use the symmetry tool and mastering the chamfer tool. I extended my knowledge of 3D modeling after completing this activity by learning how to shape things better, adding symmetry to my models, and becoming much more efficient when it comes to modeling using editable polys. Something that would make this lesson better would be if it were to include to use of more tools, as the only tools we've currently been using so far for editable polys are the extrude, chamfer, and bevel tools.
|
AuthorHey there! My name is Ivan Kacvinsky. I am currently taking a Computer modeling and animation course. What I have learned how to do so far in this class is the use of 3DS max. a 3D modeling software that you can render, 3D model and animate in. All of the three things listed are things that I have been taught how to do and have done. Important: The views and opinions expressed in this blog are solely those of the author and do not represent those of Chapel Hill HS Or Chapel Hill-Carrboro City Schools.
Archives
May 2024
Categories |


 RSS Feed
